Monday, September 24, 2012

Diaper Change on the Go - Baby Shower Gift

 I have seen different versions of this idea all over Pinterest.  Here is my take on this fun idea!!

 I sewed 5 zipper pouches.  The measurements for the rectangles are 11"x10" with a 1 1/2' pleat in the bottom.  They are each lined.  For instructions on making a basic zipper pouch, look HERE, HERE or HERE.  I choose to sew 5 because 10 seemed like a lot!
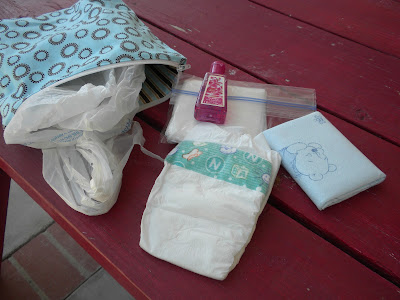
 Each zipper pouch holds 1 diaper, 1 disposable changing pad, 1 Ziplock of wipes, 1 bottle of hand sanitizer and a trash bag.  This is essentially all the things you need for 1 diaper change.  The idea is the mom can grab one of these on the go and know she is prepared.  As the child grows, you can add in things like baby food, spoon, disposable bib, etc.

 Put them all inside and you are good to go!

 I bought a basket and placed all the pouches in.

Print out a tag & tie it onto the basket
Click HERE for the pdf of the Blue Tag Instructions.
Click HERE for a Pink version

 No, off to the baby shower you go!!


Wednesday, September 19, 2012

It's Apple Time!!


 I saw these stuffed apples in a magazine somewhere and decided to create my own.  I wanted to have this ready for September 1st - I am only 19 days late!  Oh well - life is busy - isn't it!!

Here's what you need to make your own bushel!

Supplies:
fabric - charm squares or scraps
stuffing
ribbon
green and brown felt
sewing machine
hot glue gun

Start by pieceing the front of your apple.  Sew the charm squares or scraps.  This is a great scrapbuster!  Press seams to one side.

Print out this apple pattern and size how you want.  Cut your pattern out

 Layer and pin your apple back, pieced front (wrong sides together) and the pattern on top (below photo)
 Cut around pattern using your pinking shears.  Leave about 1/4 inch allowance from pattern.
 Cut a ribbon loop and a brown felt stem.  Tuck these in between the front and back apples so they catch in the seam.
 Sew around the apple leaving a small opening to stuff.
 I also tried sewing around the apple with the pattern pinned on to help me get a perfect seam.  Use what ever seems easiest.

You can see where I started and stopped, on the flattest side of the apple.
 Stuff then sew shut
 I cut leaves out of green felt and hot glued them on - I ran out of time.  I wanted to stitch detail in the leaf using embroidery floss - but they look OK without the detail.
Hang as desired and give to all your friends!!


Monday, September 17, 2012

Painted Halloween Jar Candles

I made these jars a few years ago.  I have been asked a few questions about the process, so here is a more detailed set of instructions. 


Supplies:
jars, craft paint, white school glue, vinyl motifs


1.  Collect glass jars - any kind: pickle, relish, molasses, spaghetti sauce, etc.  Mason jars can work - but it's nice to have a smooth surface for the vinyl to adhear.

2.  Remove all labels, wash & dry the jars

3.  Put a fair amount of glue into a paper bowl and add some paint.  I didn't measure - but it's more glue than paint.  You are just trying to tint the glue.

4.  Start painting the inside of the jars.  You can be real precise and get the glue/paint even, or I like to make it look drippy and spooky!!


5.  Let the jars dry

6.  I cut out trees, pumpkins, bats, spiders, etc. on my cricut.  If you don't have access to a cutting machine, I have seen black Halloween silhouettes at the Dollar Tree you could Mod Podge to the outside


7.  I put real candles in my jars.  If you are worried about flamibility, you can use battery lights or even twinkle lights.

Hope this helps!  Happy Crafting!!


Friday, September 14, 2012

Burlap Halloween Banner

 I just discovered the fantastic world of spray painted burlap!  Where has this idea been all my life!!!  Here is how you can make your own super cute Halloween Banner:

Supplies:
Burlap (I bought mine at Joann's - very inexpensive)
scissors
spray paint (white, orange, black)
sticker circles
double fold bias tape

Here is what you do:
 Cut your burlap into triangles.  I just used scissors.  I made a paper pattern and pinned it.  Not all of mine are perfect - burlap kind of stretches - but not to worry - it will still be cute!

Spray Paint White
I painted both sides of my triangles - I was worried they would blow in the wind & I wanted them to be colored on both sides.  Spray paint the burlap triangles white.  This helps the polka dots have a little more contrast.  My burlap doesn't look bright white, it just looks not as brown.

Circle Stickers
Get your circle stickers (I got mine at Albertsons because that's where I was).  Put dots all over both sides of the triangles.
Spray Paint
I painted half my triangles orange and half metallic black (that's what was in the shed).  Paint one side, let dry, then flip over and paint the other side.
 Remove the dots and get really excited because they look so cute!
 Sew
 Measure your bias tape and cut it how long you want your banner - leaving extra to tie at the ends.  Open the bias tape and put the edge of the triangle inside and sew making sure to catch both sides of the bias tape.  I didn't pin - just keep feeding the triangles in as you sew. 


 Hang as Desired!!!
 I Love it!!!

Wednesday, September 12, 2012

Boo Chevron Pillow


Just sewed up this Halloween pillow for my front porch.  I LOVE chevron print for Halloween.  I appliqued the letters out of orange spiderweb fabric - took about 15 minutes to make!  Can't wait to make more Halloween pillows!

Halloween Wreath


The girls over at Eighteen25 are showcasing a new Halloween Project Tutorial everyday.  I decided to make one of the projects.  It's a Halloween wreath.  Click HERE to see their featured wreath and tutorial.  This is my version!!

Start with a wreath from the dollar store.  Eighteen25 used a foam wreath - this woven wreath is all our dollar store had.  Then get black and white fabric.  I tore mine in 4" x WOF strips.  I used about 5 strips.
 Hot glue the fabric every so often, kind of bunching it together where you glue it.  (I only burned myself 4 times!!!)

 Go all the way around the wreath, then glue fabric around the inside and then the outside using the same bunch & glue technique.

Next  cut a 12x12 piece of Halloween paper into 4" strips - you need three strips.  I scored each strip every half inch.  Then accordion fold the strips, glue them together to form a large rosette. 

 I hot glued a piece of black spiderweb paper into the center. 


 I added a vintage Halloween card to the front.  You can decorate it any way you want.  I think the fabric glued to the wreath is such a cheap, fast, easy base for any wreath for any occasion!!