Wednesday, May 30, 2012

June Cleaver


I was in bed sick for a few days and decided I would spend my time watching Leave it to Beaver.  I used to watch the show a lot as a child - loving all the predicaments Beaver would get into.  As a teenager I enjoyed watching the show because Wally was so cute!  As an adult I am drawn to it because I love June Cleaver.  After watching about 25 episodes in 2 days - I feel somewhat of an expert on her!!  The pearls, the dresses, the linen table cloth, the home cooked dinners, the tray of sandwiches on Saturdays, the parties, and the propriety of it all.  Don't you want to be her?  As I was laying sick in bed with my hair in a messy bun, pjs on & Kleenex everywhere - I decided I would be more like her. 

 I visited an antique shop while visiting my parents & found these little items which reminds me of my new goal!  I don't think they are all from June's kitchen in 1957, but they are old enough to remind me to have a little more class, patience, and simplicity!


In every episode June is sporting a half apron.  I picked these half aprons up for 50 cents each.  They have hand embroidered work on the bottom of each.  I love them!  And more importantly I will be wearing them!


Tuesday, May 29, 2012

Ruffled Tote Winner Announced

I have been out of town for the Memorial Day weekend.  Now that I am back I have a winner for my Ruffled Tote bag!  The winner was drawn at random and it is Beth who commented "I am a new follower via GFC.  Love the bag!"

Thanks to all of you who stopped by my blog.  I wish I had enough bags to send everyone!  As a consolation prize, I will be posting the tutorial of how I made the ruffled tote this week so you can make your own!

Thursday, May 24, 2012

Mother's Day Quilt

 I made this cute little quilt for my Mother-In-Law for Mother's day.  I  love the ruffles in the quilt.  The perfect size for a lap, table, or sofa.


Monday, May 21, 2012

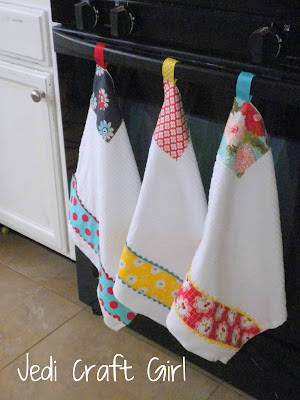
Kitchen Towel Makeover


 I made these kitchen towels to go in my newly updated kitchen.  They are so much fun to make.  I love quick sewing projects like this because I get a "fabric fix" without a lot of mess!

I made these towels using "bar mop" towels from Target - they are $4 for a set of 4.  I recommend washing them - they turn all different kinds of shapes in the dryer!

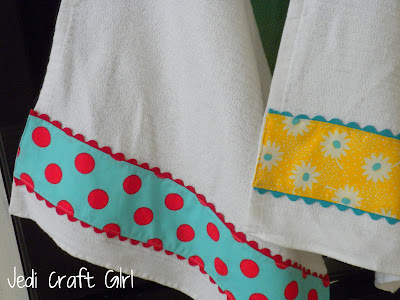
I sewed a band of fabric with Ric Rac edges to the bottom.  I folded the raw edge in at the sides of the towel and top stitched the whole thing.  The top loop I made with ribbon and Velcro - that way I can get them on and off the handle of the oven.   I sewed an accent square out of a charm square (5") in the corner to hide the ribbon ends.  Easy Peasy!!


Giveaway Day

 This week is Giveaway Week at Sew Mama Sew.  If you are new to my blog - WELCOME!!  I am Amanda aka Jedi Craft Girl & I love to sew, craft & quilt - all while being really thrifty!  Here is what I came up with for my giveaway - a Ruffled Tote Bag.  It is a denim bag with 4 ruffles & fabric flower.  To enter to win this bag, become a follower to my blog & leave a comment.  This giveaway will be open until May 25th at 5:00 P.S.T.  The winner will be drawn at random & I will post the winner on May 27th.  (This is for domestic USA residents only. )
Isn't it cute!!!


Laundry Room Update

 My laundry room is finally coming along.  David finished the tile work and built the shelf this past weekend.  I decorated the buckets and tubs with fabric tape from my friend Judy at Sprizzie.  I love it - she also has lots of fun washi tape!  I don't keep all my laundry in here - there just isn't room.  This is where the stragglers life.  The rest is in hampers in everyone's room.
 I bought these vintage frames at a garage sale.  The art work was a little faded.  I printed out photos of my girls wearing clothes I wore when I was little and I mounted them right on top of the vintage prints.

The frames are really hanging on the wall - the fabric bows are made to look like the picture is hanging from them - the bows are actually hot glued on!
 Oh yes, the lost and found board is in full use!  It's kind of embarrassing how many missing socks I am responsible for!!
 Finally I cut this little phrase out and put it on the door.  I found it on the internet somewhere & loved how it turned laundry into something to be thankful for!  A nice reminder for sure.

I have a few more things to finish - I am making a little quilt to hang above the backsplash.  Hopefully it will get done soon!

Sunday, May 20, 2012

Polyester Flowers

 We made these in Relief Society.  They were really fun and super easy!! 


To make these, get your polyester fabric - sheer and thin seemed to work the best.  Cut out circles - lots of variety in the sizes.  I played with mine - but a 5 or 6 inch circle worked the best for the largest pieces. 

Next cut slits like in the diagram below.  The deeper the slits the deeper the petals.  The more slits the more petals.  Again, it was fun to play around to get the look I wanted.

Then take a candle and hold the edges of the fabric above the flame so the fabric singes & melts.  This creates the ruffelly petally look.  And who doesn't love to play with fire while crafting!!

Finally I pinched the centers of the flowers and hand sewed them all together.  You can add buttons, beads, rhinestones, or anything to the centers - the possibilities are endless!  I hot glued an alligator clip to the back so Sally (or mommy) can wear!!

My Favorite Wall Hanging


I love my Whooo La La wall-hanging.  I was inspired by the Michael Miller fabrics and these quirky little hooties.  It's also a lot of fun to say "Whoooooo La La"!!!!  The applique is done on the machine as well as the quilting.  I have it hanging in my upstairs hallway and when I walk by it makes me smile.  That's what a quilt should do right?  Make you smile!!  I am entering it in the Blogger's Quilt Festival over at Amy's Creative Side.  There are so many amazing quilts entered!


Tuesday, May 15, 2012

Lined, Draw-String Fish Bag

 My daughter is going to Hawaii and she wanted a little bag to keep her mask in so it wouldn't get scratched by all the sand in her beach bag.  I found this tutorial on In Color Order blog.  It is the best tutorial & and the bags come out darling!  I love that they are fully lined.  My daughter choose the tropical fish fabric.  I would have sewn the ties out of fabric - but I ran out of time so we just used ribbon.  Now I must make a dozen of these for me!!

Friday, May 11, 2012

3rd Grade Mother's Day Craft

I needed a quick & low-cost Mother's Day craft for 3rd grade.  Here is what I came up with.  It was fun & crazy at the same time.  I forget how long it takes younger people to craft - but everyone finished their project.


To make these pom pom pens & holder you need:
fabric 2.5" x 20"
fabric 1" x12"
ballpoint pens
can without a sharp edge
scrapbook paper
glue & hot glue


There are many ways to make a fabric pom poms - I have seen many tutorials.  This is what I came up with.  I think if I was making it myself I would have sewed them.  It's too hard to sew with 46 3rd graders!  So glue it is!  Take your 2.5" piece of fabric and snip it almost all the way through - making a sort of fringe.


Next, run a bead of glue along the bottom of the fringe.  I glued this one to the wrong side.  Glue it to the "right side" of fabric.  Then start rolling up your fringe into a tight tube.

When you are done the pom pom should look like this.  Next take your 1" piece of fabric and wrap it around the pen, gluing to secure.

Don't they look cute?


All we did to make the "Pencil Holder" was glue a strip of scrapbook paper around the can.  Of course you can get super cute with die cuts, vinyl, ribbon, buttons, and ric rac - but we are keeping it simple for 3rd graders!!!


Next we needed to wrap the gift.  Wrapping 46 gifts can add up - so I went the brown paper bag route!  I bought doilies and cut them in half.  The learners glued the doily to the front, placed the gift inside & wrapped the outside with variegated pink cotton yarn!  Done!


I was exhausted when I came home from making this craft at school.  I don't know how teachers do it.  They are amazing people!!


Wednesday, May 9, 2012

How to Ruin a Quilt


This is a new topic for me.  I usually spend my time creating new, beautiful quilts.  Today I will share with you how to ruin one!  First put your newly-finished quilt on the living room couch.  Then wait for your psycho Bengal Cat to attack the quilt.  Let him bite it and claw out all the stitching you've worked so hard on!  When he is done you are left with tiny holes in the fabric and loose threads!!

Don't let the cute little sleepy head fool you!!!

If you look closely at the quilt - you can see the threads!!  I have since removed the quilt & placed an older quilt there.

Tuesday, May 8, 2012

5 Minute Fix-Up


 I literally had five minutes to pull this outfit together.  I had bought a stack of solid shirts for Sally hoping to embellish or "fix up".  I have tons of ideas pinned on Pinterest - ruffels, gathers, buttons, etc.  Not today - but the shirt still came out cute!  I drew a crazy daisy on some Heat Bond.  Ironed it to the yellow fabric, cut it out, ironed it to the T-shirt & stitched it in hot pink thread with the Free Motion foot.  Added a center to the flower & stitched that as well.

For the headband - I cut 2" WOF of the yellow fabric.  I didn't even hem the edge.  I ran a gathering stitch along the length.  Gathered & hot glued it to a circle of felt.  Made a quick fabric button & hot glued that into the center.  Done!!
 Don't you love the dangly clip-on earrings!  I got them at an estate sale for $1!