Once again, The Brown Eyed Baker proves to be my favorite cooking blog ever! Her caramel sauce is amazing. I made it last night and wanted to eat the entire batch! Go to her blog for a complete step by step (with photos) tutorial. She makes her's "salted". I left out the salt in mine because I was taking it to a shower & not sure if the salted flavor would go over. If you just want the recipe here it is:
2 cups granulated sugar
12 tablespoons unsalted butter, at room temperature, cut into pieces
1 cup heavy cream, at room temperature
You heat the 2 cups of sugar in a sauce pan until it is melted. This takes a while & I was convinced it would never melt! But it does. Cook the sugar until it is a dark amberish-redding-orangish color (350 degrees) I didn't use a thermomater - you can tell when it is cooked. If you over cook it it will taste burnt - mine was right on the fine line of not being burnt.
Then add the butter and stir in until melted. Then turn off the heat and add the cream until all mixed in. Let it sit for about 10 minutes & you're ready to gobble it down!!
Friday, July 20, 2012
Thursday, July 19, 2012
Sewing like Crazy
I have been sewing like crazy! Today I am making a baby quilt and 14 zipper pouches. I will post photos once they are finished!!
Monday, July 16, 2012
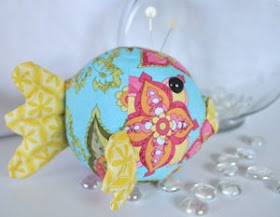
Blow Fish Tutorial at Riley Blake
I haven't been able to post any new projects but I did find this darling fish tutorial. It's from Riley Blake Designs and I can't wait to make a school of them!!
Thursday, July 12, 2012
Tie-Dye Insanity
Tie-Dye Round 3!
The tie-dye addiction continues. This round started because we needed a few gifts & thought it would be fun to give a tie-dye shirt....and you can't just die 2 shirts - you have to die a whole bunch so you don't waste the die. Here's how they turned out.
Oh - we tried something different - this time we did not soak the shirts in Soda Ash. We did learn that you CAN'T tie-dye a dry shirt like it says on the package. We spritzed the shirts with water so they were damp. I am thinking the Soda Ash step might be vital after all...hmmmmm.
Three swirls down the side
Colorful stripes
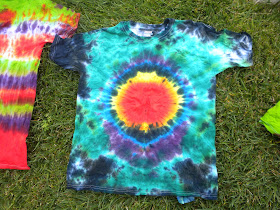
Center circle - I love this one
Center swirl
Off-center swirl - boys
Off-center swirl - girls
More swirls
Boy's Bulls Eye
Top and bottom swirl
Top swirl& scrunch bottom
Little Girl Stripe
Triple swirl & scrunch - love it!
Top & bottom swirl - love this too
Ella's heart - looks like an alien - don't know why she gave it eyes!
Swirl for Hannah
Overall I say they turned out good. Right now they are drying - then I will rinse them in cold water - hopefully all the colors stay!
Tuesday, July 10, 2012
More Tie-Dye Craziness
It helps to wear tie-dye while tie-dying...just in case you spill :)
The hardest part is waiting over a day to unwrap them & see what they look like! I will try to post better photos of each of our favorite shirts!
The rest of our vacation we wore our shirts everywhere we went. We attracted just a little attention!
Tie Dye Madness
I have been out of town for a while & now I am back! On my trip to visit my family we discovered a new craft! Tie Dye! I must WARN you.... Tie Dye is extremely addicting so read the rest of this post at your own risk :) Here's how it's done:
FIRST: Scour every Wal Mart, Target, Discount store for white shirts, white shorts, white dresses, white skirts, white fabric....you get the picture!
SECOND: Wash and dry all the white clothing.
My sis with a large basket of clothes
THIRD: Soak the white clothes in Soda Ash - just follow the directions on the box. (I think this step is optional - but we opted to use it)
FOURTH: Wring out the Soda Ash and let the clothes dry until just damp - you don't want them dripping wet
FIFTH: Now the fun part begins! Time to swirl, twirl, fold, and scrunch....oh and tie! We looked up ideas and pictures on the internet for patterns. You kinda just go for it & hope for the best. That is where the addiction comes in - there are so many possibilities & they are so fun to do!
We like to alternate swimming and tying! Above is my sis-in-law Megan & brother.
SIXTH: Mix the dye according to the directions - we used the Tulip brand they sell at Wal Mart & Michaels. You have to work fast on the next part because the dye is only active for up to 45 minutes! We had about 35 shirts to do - yikes!
I guess we did too much swimming because it got dark & we ended up dying all the shirts in the dark with flashlights! I don't recommend this :) You have to have a clean surface for each side of the shirt - so we had to hose off the area to keep it dye free. It was a little crazy.
SEVENTH: Dye the shirts. You are supposed to put the light colors on first, then add darker colors. There are lots of fun pictures & videos on the internet showing different ways to color them. After a while we were just squirting dye at random!
After you dye the shirts, tie them up in a plastic bag and let them sit for at least 24 hours - longer is better. Then the fun part begins - it's like Christmas! Unwrap each shirt and behold your creations!!
Megan's SF Giants shirt
Tie Dyed fabric
Megan's scallop
Melinda's single swirl
My triple swirl
Ella's Heart
Mallory's striped shorts
Logan's spiral
Final Note: After you unwrap your shirts hang them up to dry completely. Ours were still pretty wet & drippy. Once dry, rinse them in the washer (no soap) and dry. I am careful to wash tie-dye together just in case it runs or bleeds in the wash.


